Seal a Drafty Window With Clear Tape
by Abdulrasaq • DIY Guides • August 10, 2025
That sneaky cold breeze around your window frame? It’s basically your heating money slipping outdoors. When you need a fast, invisible fix that won’t wreck paint or upset your landlord, clear tape is the hero. You’ll find where the air is leaking, prep the surface so tape actually sticks, then create a clean, airtight path around the gaps. This takes minutes, buys you comfort immediately, and you can still do a permanent fix later when you have time.
What You’ll Need
- Clear tape: packing tape or transparent weather-seal tape (matte “invisible” tape is fine for tiny gaps).
- Paper towels or a microfiber cloth, mild cleaner, and a little rubbing alcohol for degreasing.
- Scissors or a utility knife; a hair dryer helps flatten wrinkles.
- Optional: thin foam weatherstrip or rope caulk if the gap is larger than tape alone can handle.
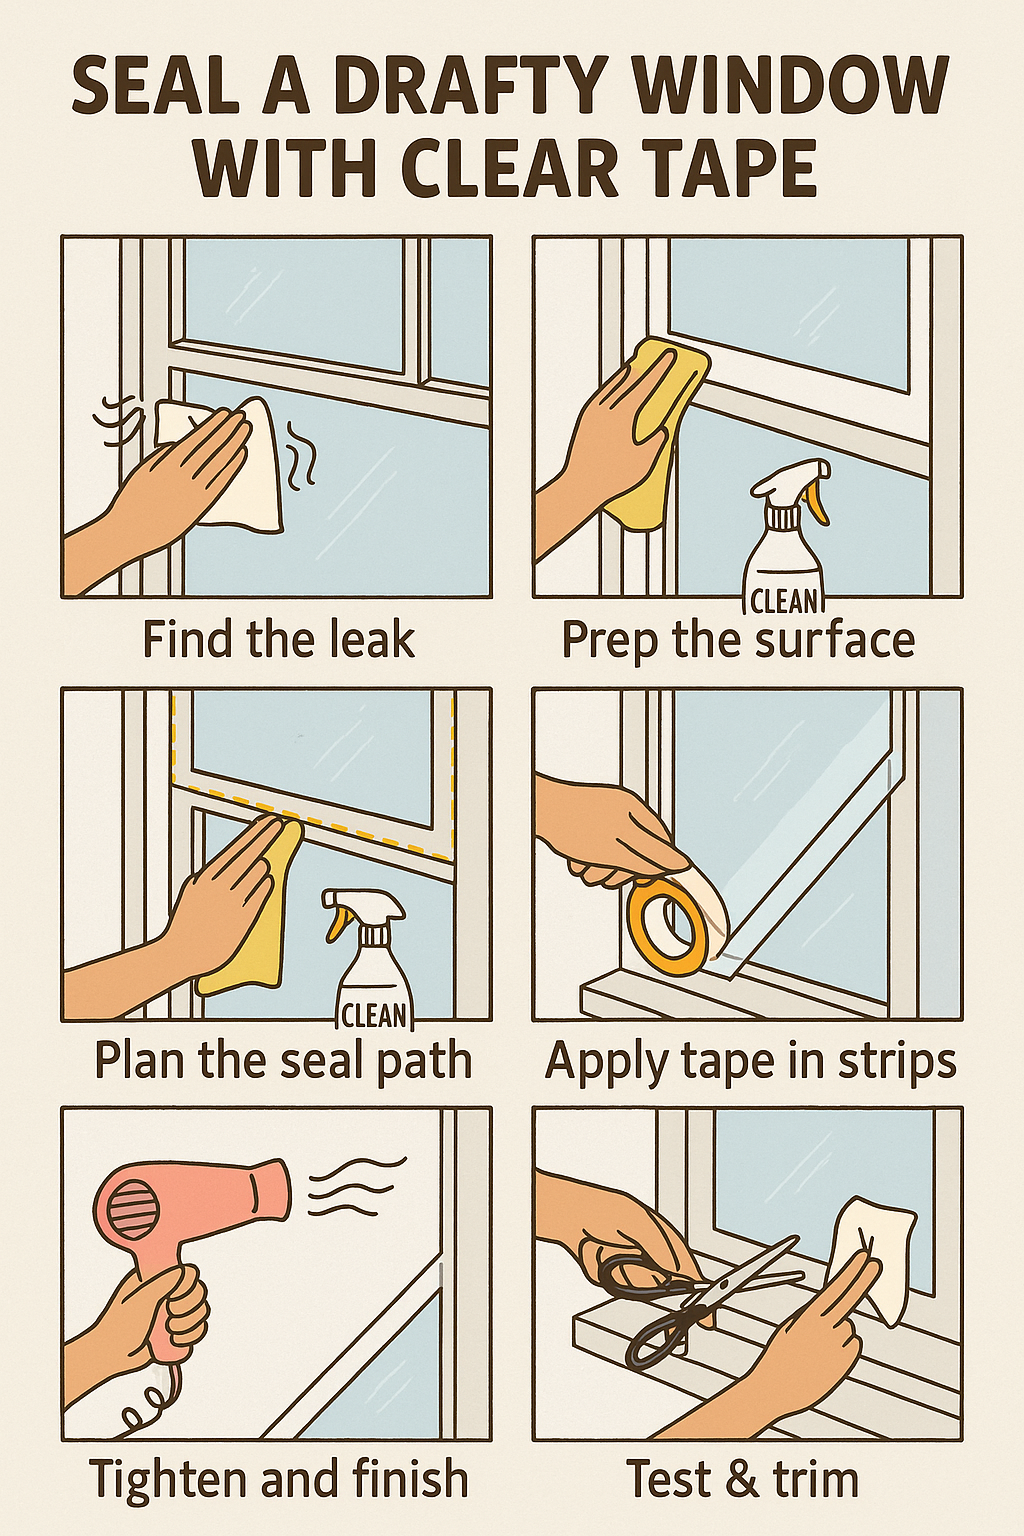
Step 1 - Find the Leak
Close and lock the window. On a breezy day (or with the fan on low aimed outdoors), use the back of your hand to feel along the edges: where the two sashes meet, along the latch, and around the frame. A tissue test works too-hold a tissue and move it around the perimeter; if it flutters, you’ve found moving air. Mark those zones lightly with pencil.
Step 2 - Prep the Surface
Tape sticks to clean, dry surfaces. Wipe dust and moisture from the glass edge and frame. If the paint is glossy or a bit oily (kitchen windows!), wipe the tape path with a small amount of rubbing alcohol and let it dry fully. The extra 30 seconds here means the tape won’t peel up tomorrow.
Step 3 - Choose Your Seal Path
Two options:
- Targeted seal: Tape only the leak lines (e.g., where the upper and lower sashes meet). The window can still open.
- Full perimeter: Tape all the way around the operable sash to lock it shut for the season. Most airtight, but you can’t open the window until removal.
Step 4 - Apply Tape Like a Pro
- Start in the top corner. Pull a strip just longer than the side you’re sealing.
- Stick the first 2–3 cm, then press-and-smooth your way down with a cloth, keeping the strip centered over the gap.
- Overlap corners by 1–2 cm. This prevents tiny triangles that leak.
- If gaps are uneven, add a second strip to “bridge” the low spots.
On sliding windows, run tape along the interlock where the panes meet and any side channel with daylight. For casement (crank) windows, tape around the sash-to-frame contact edge and especially near the lock side.
Step 5 - Tighten, Smooth, and Reinforce
Wrinkles or bubbles reduce the seal. Warm stubborn areas with a hair dryer on low and sweep them flat with a cloth. If you still feel air at a spot, add a tiny piece of foam weatherstrip under the tape or press in rope caulk, then cover with tape for a clean look.
Step 6 - Test & Trim
Repeat the tissue test. If the paper stays calm, you’re done. Trim excess tape with a sharp blade so the edge line looks neat and nearly invisible. Press once more all around to set the bond.
Extra Tips (Worth It)
- Lock the window before taping-locks pull sashes tighter and shrink the gap.
- Paint-safe removal: warm the tape with a hair dryer, then peel slowly at a low angle to avoid lifting paint.
- Condensation watch: If moisture builds up inside the taped area, open the tape briefly on a dry day to vent, then re-seal.
- Pet & kid zones: Run tape slightly back from reachable edges so curious fingers can’t start an easy peel.
When Tape Isn’t Enough
If you can see daylight through the frame, tape is just a band-aid. Add adhesive foam weatherstripping to the stops, use rope caulk for seasonal gaps you want to remove later, or consider a clear shrink-film kit for a whole-window barrier in deep winter.
Safety & Surface Notes
- Do not tape over emergency egress windows if it would block your only exit from a room.
- Fresh paint needs time to cure; taping too soon can lift it. If unsure, test in a hidden spot first.
- Old, brittle finishes may flake-warm the tape to remove and go slow.
Quick Troubleshooting
- Tape won’t stick: surface is damp or oily-clean with alcohol and dry thoroughly; switch to weather-seal tape.
- Draft moved: the first seal redirected air to another gap. Repeat the tissue test and spot-seal the new leak line.
- Fogging between panes: that’s a failed insulated glass unit (inside the glass), not a frame draft-tape won’t fix that; consider replacement later.
30-Second Recap
- Find leaks with your hand or a tissue.
- Clean and degrease where tape will go.
- Choose targeted or full-perimeter seal.
- Apply tape in smooth, overlapping strips.
- Warm, smooth, test, and trim. Done.
Clear tape isn’t glamorous, but it works immediately and looks nearly invisible. When the season ends, warm it up, peel it off, and you’re back to normal-warmer in the meantime, with a lower bill to prove it.