How to Make a Phone Stand Using Cardboard
by Abdulrasaq • DIY Guides • August 9, 2025
Want a clean desk setup without buying another accessory? A cardboard phone stand is surprisingly strong, endlessly customizable, and takes less than 20 minutes to make. The trick is using folds in the right places and a simple triangle brace so the weight transfers into the base instead of collapsing the front lip. This version fits most phones with or without slim cases, holds them in portrait or landscape, and even includes a tiny notch for a charging cable so your phone can sit and charge comfortably during videos or calls.
What You’ll Need
- Cardboard: A panel from a shipping box (single or double wall). Choose a clean, uncrushed section.
- Ruler & pencil: For straight, repeatable measurements.
- Craft knife or sharp scissors: Knife gives cleaner edges; use a cutting mat if possible.
- Glue or tape: White glue, glue stick, or clear packing tape works. Hot glue is great but optional.
- Scoring tool: The dull side of a butter knife or an empty ballpoint pen to crease folds.
- Optional: Decorative paper, washi tape, or markers to style the stand.
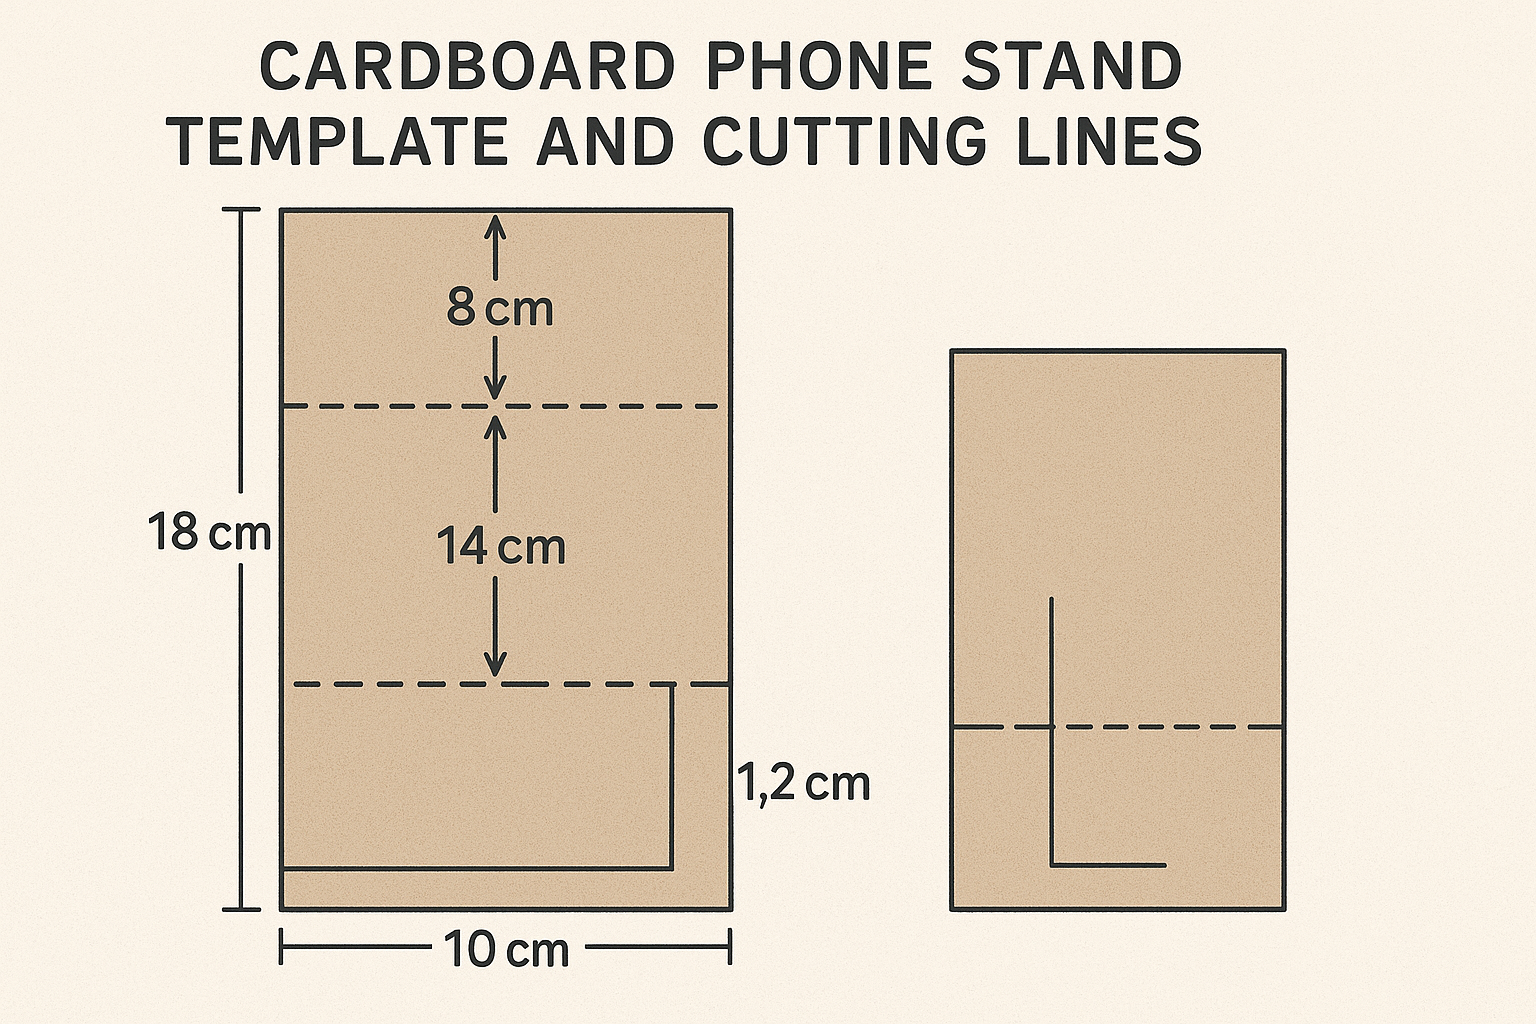
Step 1 - Mark the Template
- On cardboard, draw a 9 cm × 18 cm rectangle. This will form the back and base.
- From the top edge, mark fold lines at 8 cm (top fold) and 14 cm (base fold).
- Along the bottom edge, sketch a 1.2 cm-high strip - this becomes the front lip that stops the phone from sliding off.
- If you use a thick case or plus-size phone, widen the rectangle to 10 cm and the height to 20 cm for extra stability.
Step 2 - Cut and Score Cleanly
- Cut out the rectangle carefully. Keep edges straight - clean edges make strong folds.
- Use the ruler and a blunt tool to score the fold lines and the lip. Scoring compresses the surface fibers so the cardboard bends crisply without cracking.
- Lightly score the back of the fold lines if your cardboard is very stiff; this reduces spring-back.
Step 3 - Make a Triangle Brace
Bracing is what separates a flimsy stand from a sturdy one. A small triangle turns the back panel into a solid, load-bearing leg.
- Cut a second piece measuring 6 cm × 10 cm.
- Fold at the 5 cm midpoint to create two equal halves, then fold one half in half again to form a compact triangle when joined.
- Glue or tape the layers so the triangle stays rigid. You now have a sturdy prop.
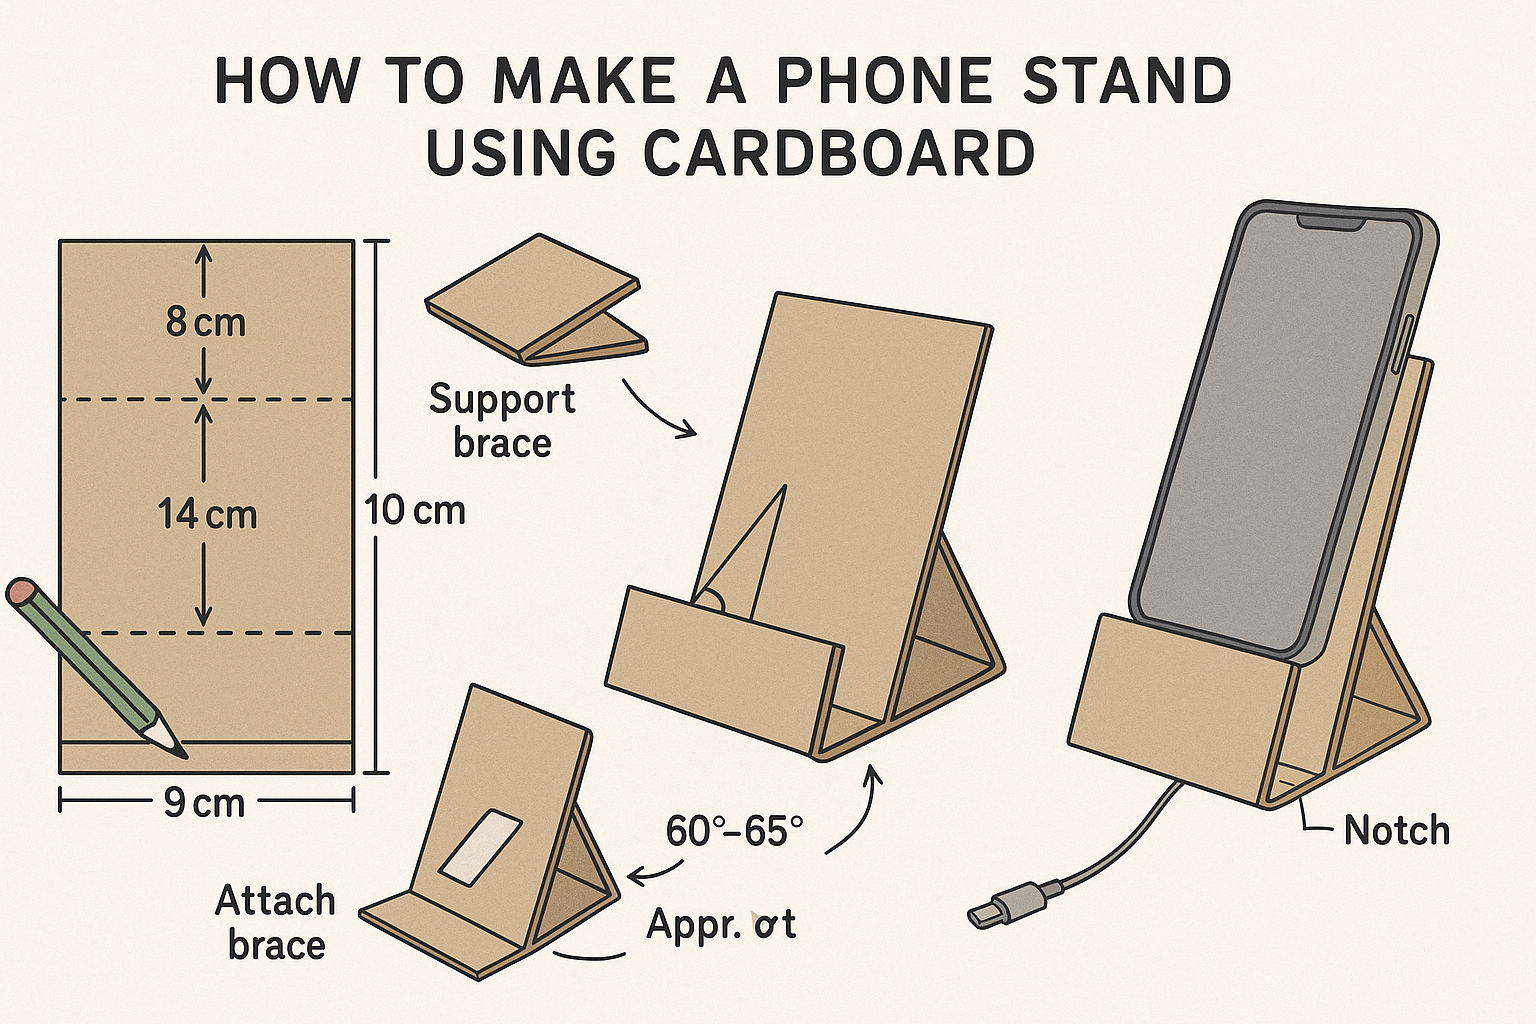
Step 4 - Form the Stand Body
- Fold the top section back at the 8 cm line to create the backrest. Aim for a viewing angle around 60–65° - comfortable for watching clips and video calls.
- Fold up the 1.2 cm lip at the bottom toward the front. Reinforce the lip with a thin tape strip on the back if your phone is heavy.
- If you plan to charge on the stand, cut a small centered notch in the lip: 0.8 cm × 1 cm is plenty for most cables.
Step 5 - Attach the Brace & Tune the Angle
- Place the brace behind the backrest. Move it up or down until the angle feels right for your desk height.
- Glue or tape the brace to the back panel and the base where they meet. Press for 30–60 seconds for a strong bond.
- Test with your phone in portrait and landscape. If it tips, slide the brace slightly rearward for more stability.
Step 6 - Reinforce, Finish & Customize
- Add a strip of tape along the hinges/folds. This prevents wear and helps the stand last longer.
- For heavier phones, glue a second layer of cardboard behind the back panel (grain crossed) to increase stiffness.
- Wrap the visible surfaces in decorative paper, or draw labels for charging slot and lip if you’re making this with kids.
- Stick four tiny felt pads under the base so it doesn’t slide around or scratch tables.
Sizing & Fit Tips
- Small phones (5–6″): Template 8 × 16 cm is fine; keep the lip at 1 cm.
- Large phones (6.5–7″+): Move to 10 × 20 cm and consider a 1.5 cm lip.
- Tablets: Use rigid corrugated cardboard with a wider base (min 14 cm) and two braces.
Troubleshooting
- Phone slides forward: Increase lip height slightly, or add a thin rubber band across the lip for grip.
- Stand wobbles: Re-score folds so they sit flat; add a second layer to the base.
- Leans too far back: Reposition the brace closer to the hinge to make it more upright.
Safety & Common Mistakes
- Cut away from your hands and keep fingers clear of the blade path.
- Don’t skip scoring - unscored folds are weak and tend to tear.
- Let glue fully cure before heavy use; tape works instantly if you’re in a hurry.