Why limit your garden to the floor? Discover how to turn your empty kitchen walls into a functional, lush herb pharmacy.
In most urban apartments, horizontal space is at a premium. But there’s one resource we almost always have in abundance: vertical surface area. A well-designed Vertical Herb Garden isn't just a space-saver; it’s a living piece of art that puts fresh flavor within arm's reach of your stove.
The Three Types of Vertical Systems
Before you pick up a drill, you need to choose the system that fits your lifestyle and lighting conditions:
1. The Pocket System (Soft-Sided)
These are often made of felt or recycled plastic bottles (P.E.T.). They are breathable, which is excellent for root health as it prevents "root circling." However, they can dry out faster than plastic pots, making them ideal for drought-tolerant herbs like rosemary or thyme.
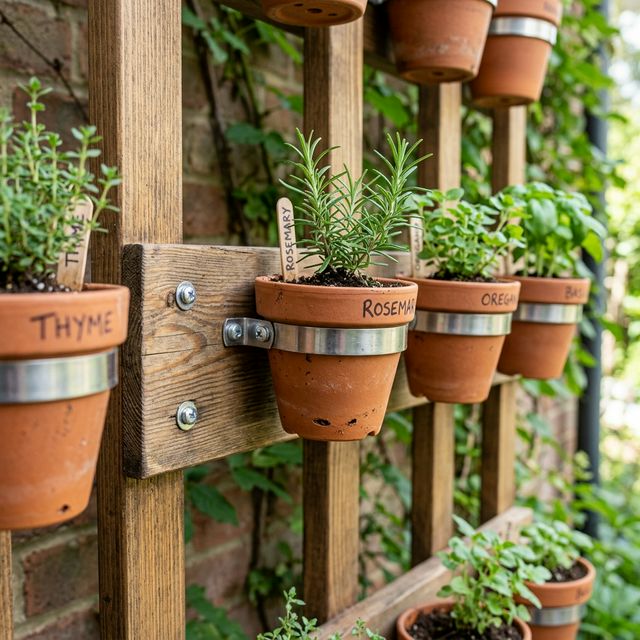
2. The Trellis & Pot Combo (Modular)
This is the most flexible DIY option. You mount a wooden or metal trellis to the wall and hook individual pots onto it. This allows you to move plants around based on their lighting needs or growth speed.
3. The Stacked Planter (Freestanding)
If you aren't allowed to drill holes in your walls, a vertical stacker (like a GreenStalk or a DIY tiered tower) is the answer. These use gravity-fed watering systems where you pour water into the top and it trickles down through every level.
Critical: The Weight Equation
Soil plus water is heavy. A 10-pocket felt planter can weigh over 50 pounds when fully saturated. Always use heavy-duty wall anchors (like toggle bolts for drywall) or mount directly into your wall studs. Never trust a simple adhesive hook for a vertical garden!
Designing for Lighting Layers
Light intensity changes as you move down a vertical wall. Use this to your advantage:
- Top Level (Brightest): Place heat-loving herbs like **Basil** and **Chives** here. They thrive on the extra rays and warmer air that collects near the ceiling.
- Middle Level: Ideal for **Parsley**, **Cilantro**, and **Dill**. These prefer steady, bright light but can handle occasional shade.
- Bottom Level (Coolest/Shadiest): Perfect for **Mint** and **Lemon Balm**. These are legendary for their ability to grow in lower-light corners where other herbs might struggle.
DIY Project: The "Mason Jar" Wall Rack
If you want a rustic, farmhouse aesthetic, this $30 project is a classic. You'll need 4-6 wide-mouth mason jars, pipe clamps (found in the plumbing section), and a piece of reclaimed wood.
- Screw the pipe clamps into the wood at 8-inch intervals.
- Add 1-2 inches of pea gravel to the bottom of each jar for drainage (crucial since there are no holes!).
- Fill with a high-quality potting mix and your favorite herb starts.
- Tighten the clamps around the jars to secure them.
- Mount the wood horizontally on your wall in a sunny spot.
Troubleshooting common Vertical Issues
Vertical gardening presents unique challenges. Here’s how to overcome them:
1. The "Drip" Problem
Unless you are outdoors, water dripping onto your floor is a major issue. Many commercial pocket systems include a waterproof backer, but for DIY setups, ensure you have a "catch tray" at the very bottom level to collect excess runoff.
2. Uneven Watering
In many vertical systems, the bottom plants stay wet while the top ones dry out. This is because gravity naturally pulls moisture downward. To combat this, use a smaller "wicking" material in the top levels to retain more water, or set up a simple drip irrigation line using aquarium tubing.
3. Nutrient Leaching
Because you are likely watering frequently in small containers, nutrients wash out of the soil faster. Use a diluted liquid fertilizer (like seaweed extract) every two weeks to keep the foliage vibrant and flavorful.
The Culinary Payoff
Imagine making a pasta sauce and simply reaching out to snip fresh Genovese basil. Or mashing a mojito with mint you grew three feet from your glass. A vertical herb garden isn't just about efficiency—its about the joy of "fresh-picked" flavor in every meal.
Conclusion
Vertical herb gardening is the ultimate solution for the space-conscious urbanite. It’s a project that rewards you with better nutrition, a more beautiful home, and a deeper connection to your food. Pick a wall, pick some herbs, and start growing UP!