Don't let the first frost be the end of your garden. With a few simple steps, you can protect your perennials and prepare your containers for a healthy spring.
In a traditional garden, winter means everything goes dormant under a blanket of snow. But on a balcony or a drafty windowsill, winter is a different beast. The wind is colder, the air is bone-dry, and containers can freeze solid, killing even "hardy" plants. Winterizing is about mitigation: protecting what stays outside and moving what must come in.
Step 1: The Frost Audit
Before the first freeze (check your local frost dates!), categorize your plants into three groups:
- The Survivors (Hardy Perennials): Rosemary, Mint, Lavender, and Chives. These can stay out with protection.
- The Immigrants (Tender Perennials): Peppers, Basil, and some decorative houseplants. These must come inside.
- The Annuals: Beans, Peas, and Tomatoes. Their life cycle is over; harvest what's left and compost the remains.
The Physics of the Freeze: Why Clay Pots Crack
If you have terra cotta or ceramic pots, winter can be their literal breaking point. Clay is porous; it absorbs water like a sponge. When that water freezes, it expands by about 9%. This internal pressure is enough to shatter even thick ceramic.
The Prevention: If you can't move clay pots inside, you must seal them or empty them. Glazed ceramic is safer than unglazed terra cotta, but even glazed pots can crack if water pools in the saucer and freezes, pushing upward against the base.
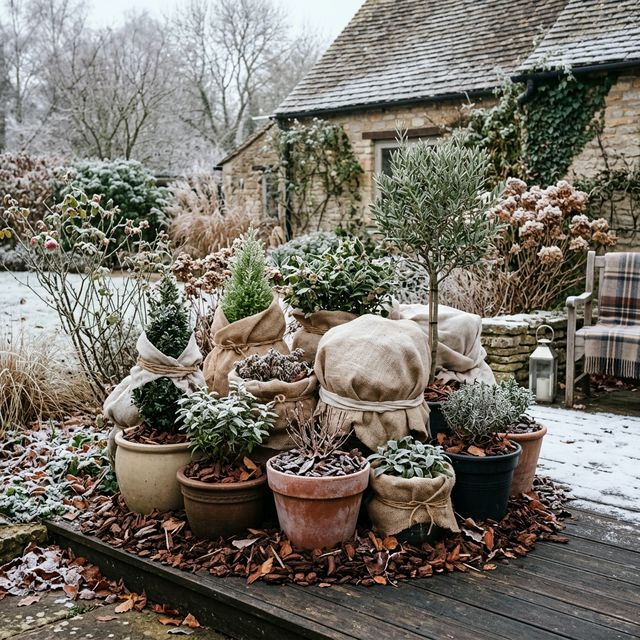
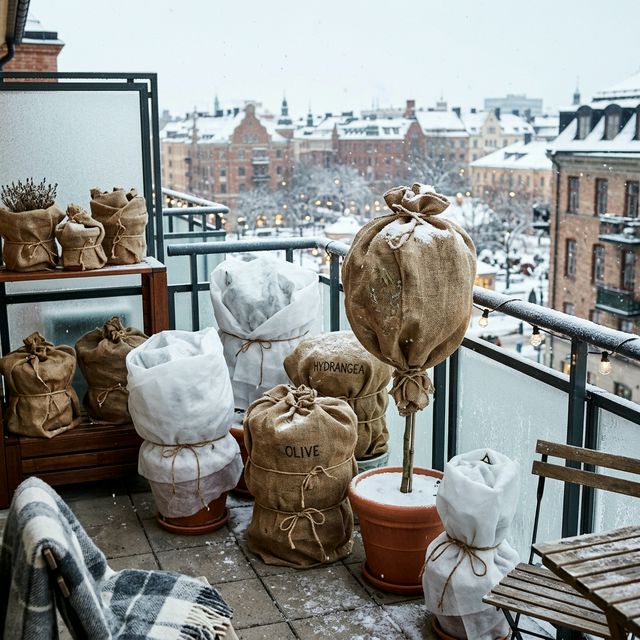
Advanced Insulation: The "Box-in-Box" Method
For those living in Zone 6 or lower, simple burlap isn't enough for a balcony garden. You need the "Box-in-Box" technique.
1. Get a large cardboard box or plastic crate significantly bigger than your pot.
2. Place the pot inside the box.
3. Fill the gap between the pot and the box with straw, shredded paper, or dried leaves.
4. Cover the top of the soil with a layer of mulch.
This creates a stable micro-climate that can stay 10-15 degrees warmer than the surrounding air. It’s the closest an apartment dweller can get to "burying" a plant in the ground.
Step 3: Managing Indoor Transitions
Bringing a plant inside is traumatic for it. The light levels drop dramatically, and the humidity plummeting can cause a healthy plant to drop all its leaves in a week.
- The Pest Wash: Before bringing a plant inside, spray it down thoroughly with a mixture of water and a few drops of dish soap. This prevents bringing spider mites into your home.
- The Light Bridge: Don't move a plant from full sun to a dark corner. Place it in your brightest window and consider using a grow light for 8-10 hours a day to supplement the weak winter sun.
- Humidify: Use a pebble tray with water under your indoor pots to raise the local humidity.
Winter Light: Understanding the DLI
In winter, the sun is lower in the sky and the days are shorter. Even if your window looks sunny, your plants might be starving. Professional growers use a metric called DLI (Daily Light Integral)—essentially the total amount of light a plant receives in 24 hours.
In December, a south-facing window might only provide a DLI of 2-5, while most vegetables need a DLI of 15-20 to grow.
The Solution: If your plants are looking "leggy" or pale, don't just water them more. They need photons. A cheap 20W LED grow light kept on for 12 hours can "bridge the gap" and keep your herbs producing all through February.
Step 4: Dormant Pruning
Winter is the time to "put the garden to bed." For your outdoor perennials like Mint or Chives, cut them back to about 2 inches above the soil line once they turn brown. This focuses the plant's energy on its root system, making it explode with growth once spring arrives.
Watering Routines in Freezing Weather
A common misconception is that dormant plants don't need water. While their uptake is drastically reduced, bone-dry roots are actually more susceptible to freeze damage than properly hydrated roots. The water in the soil acts as an insulator, releasing latent heat as it freezes. You must still water your overwintering outdoor pots, but only do so during a "thaw" when the daytime temperature climbs above 40 degrees Fahrenheit. If you water a frozen pot, the water will pool on top and create an ice slick.
Preparing Soil for Spring
Winter is the perfect time to rejuvenate tired container soil. After harvesting your spent annuals, pull back the mulch and add an inch of fresh worm castings or granular slow-release fertilizer. Re-cover it with the mulch and let the winter snow melt push those nutrients deep into the root zone. By the time May arrives, your soil will be primed and ready for its new occupants.
Conclusion
Winterizing is the final act of the gardening year. It's a time for reflection and planning. By understanding the physics of the freeze and the limitations of winter light, you ensure that your urban oasis doesn't just survive the holiday season—it remains a vibrant, living lung for your apartment until the first crocus of spring.